Adding digital products to your site
Available to users on paid beehiiv plans for publications using the Website Builder, which is continuously evolving based on customer feedback. Some details shown here may differ from what you see in-app.
Once you’ve created digital products, you can feature them anywhere on your site using the Products block in the Website Builder, and you can fully customize how the product pages look and feel. This guide walks you through both.
Requirements and helpful resources
Digital products let you sell offerings and services directly from your website. To use this feature, you’ll need to:
- Be on a paid beehiiv plan (Scale or higher).
- Have a connected Stripe account for payment processing (required for paid digital products only, free digital products do not require Stripe).
If you haven’t created your products yet, start here:
You can create a product purchased segment to send newsletter content to subscribers who purchased or did not purchase a digital product from your website. Learn more about segments by reading our guide, Creating and using segments in beehiiv.
How to add digital products to your website
- From your account dashboard, go to Website > Builder.
- Open the page where you want to feature digital products, or create a new one.
- From the left toolbar, click the + icon to insert a new element. Under Synced, select the Products block and drag it onto the canvas.
- In the Product Selection modal, choose which live products you want to display (more details on this below).
- Your selected product(s) will appear on the canvas. Use the design panel on the right to customize the look of the product cards. In the screenshot below, under the Layout section, we adjusted the Columns to 2 from 3.
- Click Publish in the top-right corner of the builder. Then select:
- ‘This page only’ to publish the new changes to your product page template.
- Or, if you’ve been making multiple site edits and are ready to publish, select All pages.
- Then click Publish to live site to finalize.
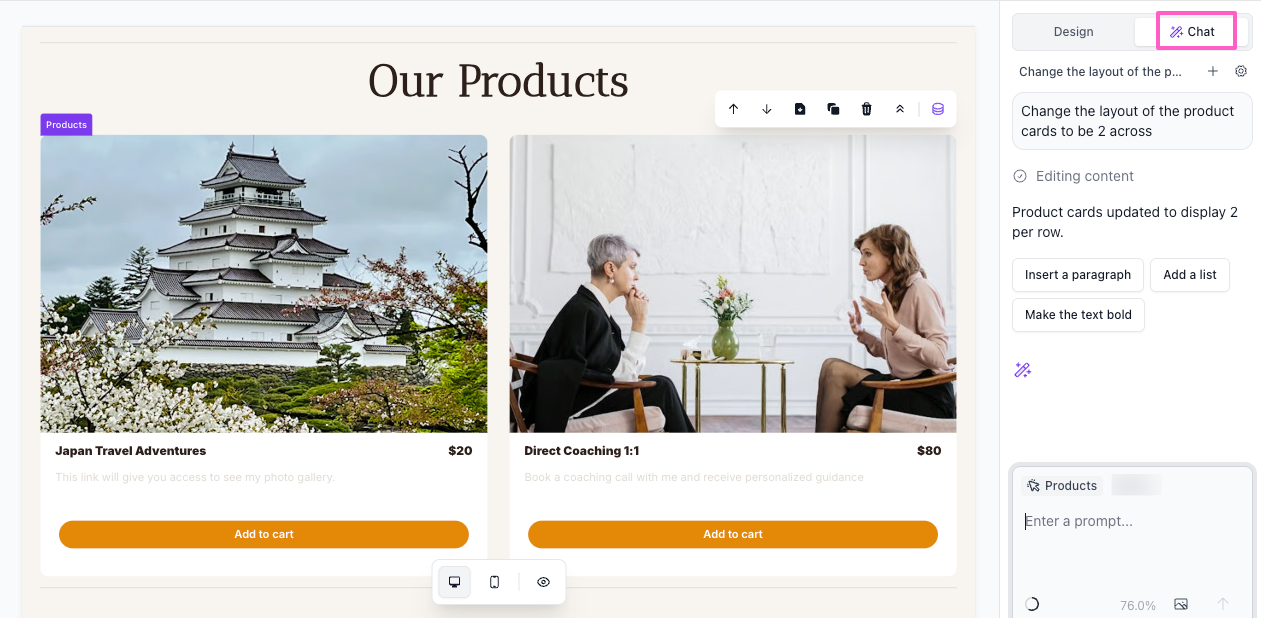
At any time, you can switch over to the design panel to Chat mode and use AI prompts to make styling changes. For example, directing the AI to ‘Change the layout of the product cards to be 2 across’ achieves the same result as adjusting the Layout settings manually in step 7 above.
Choosing how products are displayed
When you add a Products block to a page in the Website Builder, you can choose from three display modes that control which products appear and how visitors browse them.
Product display options
Latest: The Latest option automatically shows your most recently created products. When you publish a new product, it appears in the block without any changes to your site. This is the best option if you regularly add new products and want your page to stay current without manual updates.
Free Selection: The Free Selection option is the original behavior for the Products block. You hand-pick exactly which products appear by choosing from your product catalog. The block displays only the products you selected and does not update automatically when new products are added.
Archive: The Archive option displays all of your live products in a single browsable list. Visitors can scroll through your full catalog and click Load more to see additional products. This mode works well if you have a large or growing catalog and want visitors to be able to explore everything you offer.
Featured: The Featured option shows only products you have explicitly marked as featured. All featured products display at once with no pagination. This is useful for highlighting a curated set of products on a homepage or landing page without surfacing your entire catalog.
Only live products marked as featured will appear. Draft and archived products are excluded even if they have been marked as featured.
Setting the display mode
- In the Website Builder, select the Products block on your canvas.
- Select a Products block on the canvas, or add one from the left toolbar under Content blocks > Synced data.
- Click on the Data button to enter your product data block settings.
- The product selection modal will open. Use the Product type dropdown to choose between Latest, Free Selection, or Archive.
- Optionally, filter by a product tag to show only products matching a specific digital product tag. For instructions on creating and assigning tags, see How to create and use product tags.
- When you’re done making your selections, click on Save to return the canvas.
How to customize the look of your product pages
When someone clicks a digital product on your site, it opens a dedicated product page. You can customize the design of these product pages directly in the Website Builder.
- In your account, go to Website > Builder.
- From the left toolbar, click the + icon to add an element. Under Dynamic pages, select Product.
- The product page template will load on the canvas. Click any element on the page to open its settings in the design panel on the right.
- Adjust layout, spacing, colors, and typography manually, or
- Switch to Chat mode to use AI prompts for faster styling updates.
- When you're ready to publish your changes, click Publish in the top-right corner and choose:
- This page only to publish updates to the product page template, or
- All pages if you've made additional edits across your site.
- Click Publish to live site to finalize.
-
Once published, every digital product on your site will open using the updated product page design.
This applies to paid digital products only. Free digital products do not process payments through Stripe. For more information, read our guide on setting up a Stripe account for paid subscriptions and digital products.